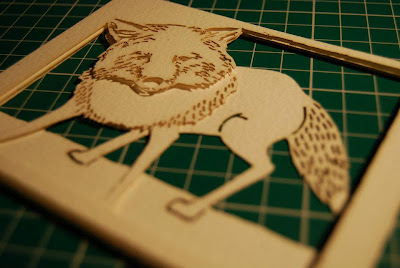
To recap. here was by first mock up that I posted in my last self promotion post.
I made an accurate template, taking into consideration things like the thickness of the paper I was using; watercolour paper, which is thicker and more textured than the cartridge and printing paper I had used for the mock ups. I added a few extra mm's to account of the space lost in folding which was a guess but I thought always better to have too much than not enough.
Here is the design for the inside. The design separates into 3 pieces onto 3 sheets to go inside the boxed container. To use the lazer cutter, the image has to be scanned in and transferred into Illustrator. The outline can be made as a path so that the lazer will just cut along it and not take around the two sides of the black line. For the bits in the middle, a red marker has to go around the black pieces that are to be cut all the way around the black line. Once that is done it's straight forward to get multiple pieces cut out. Each set of 3 took 6 minutes to cut out.
Here is the entire stack of cut out sheets I had by the end of the day.
One set layered up creates shadows which create the definition of the small cut out marks. This piece I layered up with come double sided foam to keep for myself. The lazer cutter also picked out little marks from the scan and cut these pieces out too, I think these pieces become part of the aesthetic and look quite nice. They fit with the slightly burnt edges that come as a result of the lazer.
Here are the 3 separate sheets.
And here are the sets together. I found that the lazer cutter made it so easy to create as many identical cuts as I needed. It can be used in the future for fundraising/selling pieces and will also prove helpful if I want to carry on with making bigger pieces to exhibit.
I tried colouring a few in to see what they would look like. I liked the red fox but think the piece stands well enough by itself as you can see the marks made by the lazer cutter and I think it has a nice aesthetic by itself. For more one-off pieces though I think the colour will be nice; it's definitely something I can look a with my main project.
The box was easy to make once I had the template. I just had to mark and score in the fold lines. I think to do this on a larger scale I would use the lazer cut machine again but I wanted to make sure this was clean cut and accurate to make sure everything fitted together.
The sheets were attached to two separate strips as it would be easy to slide these into the box and attach them rather than trying to attach them to the sides inside of the template. The sides were folded on both sides, facing opposite ways so they will all flatten down.
In the box unattached.
All done.
(All above images are my own, all artwork shown has been made by myself)
I am really pleased with this piece and I think it's opened up a lot of opportunities in the future to think about using the same techniques.


Well Done you! The piece looks amazing. You're definitely really talented.
ReplyDeleteThat Is So Cool I Wish I Was Talented Like That My Sister Got All The Artsy Side Of the Family!
ReplyDeleteCheck Out My Blog At http://onlygonnacampherewithyou.blogspot.com/